Alarm Setup
The user can switch all alarms on or off and change the alarm set points for each sensor. For more information, see the flow charts in Alarm Setup.
See Factory-set Alarm Thresholds and Setpoints for alarm adjustment limits. The value of the High Alarm can only be set to a value that is higher than the Low Alarm set point.
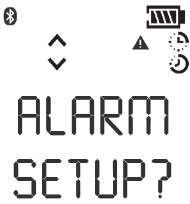
Figure 6 Alarm Setup
|
1.
|
To bypass this setup, press the q or p button; otherwise, continue as follows. |
|
2.
|
Press the  button to enter the submenu. button to enter the submenu. |
|
3.
|
Set alarms on or off by pressing the q or p button. |
|
4.
|
Press the button to confirm the selection. |
LOW ALARM settings for the first sensor display.
|
5.
|
Press the q or p button to change the value. |
|
6.
|
Press the button to store the value. |
HIGH ALARM settings for the first sensor display.
|
7.
|
Press the q or p button to change the value. |
|
8.
|
Press the button to store the value. |
STEL ALARM settings (for toxic sensors only) display.
|
9.
|
Press the q or p button to change the value. |
|
10.
|
Press the button to store the value. |
TWA ALARM settings (for toxic sensor only) for display.
|
11.
|
Press the q or p button to change the value. |
|
12.
|
Press the button to store the value. |
|
13.
|
Repeat the procedure for all other sensors. |
|
14.
|
After setting the last sensor, continue to Time and Date setup. |
60% LEL or 3.0% volume of methane is the maximum High Alarm set point that can be programmed.
The combustible alarm can be turned OFF by the user in the instrument setup. When the combustible alarm is turned OFF, the only indicator to the user that the combustible alarm is turned OFF occurs during power up of the instrument at which a startup screen will indicate that the combustible alarm is turned OFF. When turned ON, the combustible high alarm is latching.
The combustible alarm can be silenced momentarily by pressing the p button. However, if the gas concentration causing the alarm is still present, the device will go back into alarm.