Calibrating an Oxygen Instrument
|
•
|
False oxygen alarms can occur due to changes in barometric pressure (altitude changes) or extreme changes in ambient temperature. |
|
•
|
The ALTAIR Detector is equipped with a feature to allow calibration at pressure and/ or temperature of use. |
|
•
|
Be sure that the instrument is in known fresh air before performing a calibration. |
|
•
|
The ALTAIR Oxygen instrument has the ability to display the current Oxygen level with a press of the TEST button. See "Using the ALTAIR Single Gas Detector" for more details. If this reading is other than 20.8%, a calibration is required in air that is known to be safe. |
To enter the calibration mode, make sure you are in fresh, uncontaminated air.
WARNING!
Do not perform calibration unless you are certain you are in fresh, uncontaminated air; otherwise, inaccurate readings can occur which can falsely indicate that a hazardous atmosphere is safe.
Failure to follow this warning can result in serious personal injury or death.
|
1.
|
In normal operating mode, press the TEST button. |
|
○
|
The current Oxygen reading displays. |
|
2.
|
When the "TEST" "GAS" "?" displays, press and hold the TEST button to enter calibration. |
|
○
|
After three seconds, "FAS" "?" displays asking the user if a fresh air setup/ calibration is desired. |
|
3.
|
Press the TEST button at the "FAS" "?" screen to perform a calibration at 20.8% O2. |
NOTE: This procedure must be performed in fresh, uncontaminated air. Do not breathe on the sensor while performing this function.
|
○
|
If the sensor successfully calibrates: |
|
○
|
If the sensor does not successfully calibrate: |
|
○
|
The instrument returns to normal operating mode. |
|
5.
|
If "ERR" displays after calibration, the current settings did not change. Immediately check that: |
|
▪
|
The instrument is in fresh, uncontaminated air during the calibration process. |
|
▪
|
No one breathes on the sensor during calibration. |
|
○
|
Repeat steps 1 through 6, as necessary. |
|
6.
|
The display must read "OK"; if "ERR" remains, remove the instrument from service. |
|
7.
|
Perform a bump test to confirm operation and activate the "√". |
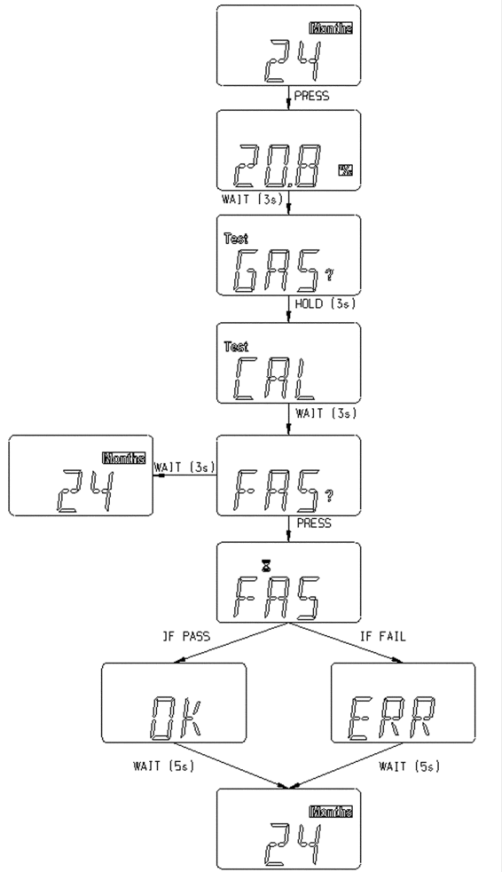
Figure 9 Calibration (Oxygen) Flow Chart