Changing Alarm Setpoints
NOTE: Alarm setpoints can only be changed manually during or before activation. Once the instrument is activated, the Alarm setpoints can be changed via the MSA FiveStar® LINK™ Software with IR communications.
To change Alarm setpoints before activation:
|
1.
|
Press the "TEST" button once. |
|
○
|
After approximately one second, all segments and the LED activate. |
|
○
|
The horn, LEDs, and vibrator also activate |
|
○
|
The Software Version displays for three seconds ("CO", "H2S", or "O2"). |
|
2.
|
Alarm Setpoints display the: |
|
○
|
Low Alarm Setpoint for three seconds |
|
▪
|
LO and ALARM icons turn ON |
|
a.
|
To change the low alarm setpoint, press the TEST button when "LO" "ALARM" displays: |
|
▪
|
"LO" "ALARM" "SET" "?" displays. |
|
b.
|
Press and hold the TEST button to increment the low alarm value. |
|
c.
|
Once the correct value displays, release the TEST button and wait three seconds to continue. |
|
○
|
High Alarm Setpoint for three seconds |
|
▪
|
HI and ALARM icons turn ON |
|
a.
|
To change the high alarm setpoint, press the TEST button when "HI" "ALARM" displays: |
|
▪
|
"HI" "ALARM" "SET" "?" displays |
|
b.
|
Press and hold the TEST button to increment the high alarm value. |
|
c.
|
Once the correct value displays, release the TEST button and wait three seconds to continue. |
|
▪
|
the unit again turns OFF. |
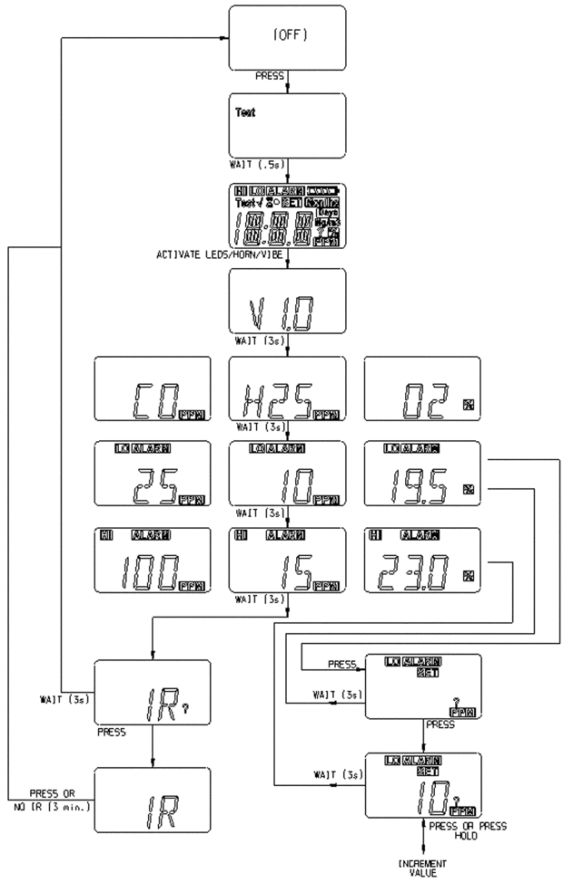
Figure 3 Changing the Alarm Setpoints