Cleaning
The presence of particulate matter, oil films, liquid water, or the residue from water drops on the device optics can adversely affect its performance. The environmental guard is designed to prevent solids or liquids from reaching the monitor's optical system. Heating elements are also incorporated into the unit to prevent water condensation. Under severe conditions, however, some material may collect on these surfaces and it may be necessary to occasionally check and clean the windows.
|
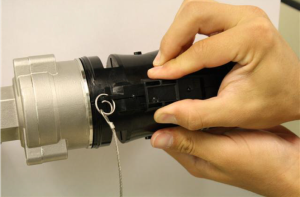
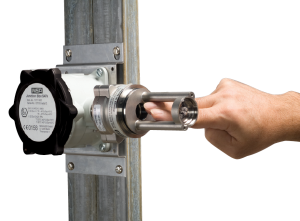
Figure 21 Remove Environmental Guard
|
|
|||||||||
|
WARNING!
The sensor will not respond to the presence of gas in cleaning mode.
Ensure that the environment is free of combustible gases before starting the cleaning procedure.
Failure to follow this warning can result in serious personal injury or death.
| • | The analogue current output will be set to the Cleaning Mode value (→ Remote Controller and Menu Sequence) during this time. |
| • | If monitoring the HART signal, the Cleaning Status bit will be set. |
Although both windows are made of a highly durable material that is not easily scratched, avoid excessive pressure when cleaning them. Clean, cotton tipped applicators are recommended to remove material collected on the windows.
| 3. | Use a dry applicator or one moistened with distilled water to wipe the window and remove dust. |
| 4. | Use an additional clean, dry applicator to remove any residual water. |
| 5. | Use an applicator moistened with isopropyl alcohol to remove heavy deposits of solids, liquids or oil films. Clean the window again with a second applicator moistened with distilled water; then, dry the window with a final applicator. |
| 6. | Avoid using excessive amounts of water or alcohol in the cleaning procedure, and inspect the window to ensure that the entire surface is clean. |
NOTE: When the cleaning process is complete, be sure to remove all objects from the light path.
When exiting the Cleaning Mode, the unit returns to normal operation. Note that residual cleaning fluids may result in an elevated signal until completely dry.
| 7. | Inspect the environmental guard for any blockages, then replace the environmental guard on sensor. |
| ○ | After cleaning the windows, it is advisable to check the sensor’s response to both zero and calibration gas. |
NOTE: If water or isopropyl alcohol is used to clean the sensor's windows, any residue from the cleaning procedure must be completely dissipated before returning the unit to service. Checking the sensor's response to zero gas is the best way to purge residual cleaning materials from the sensor. Ensure that the sensor's reading is stable before zeroing or calibrating the sensor (→ PrimaX IR+ Calibration). Failure to do so could result in inaccurate readings.
WARNING!
Do not place foreign objects in the sensor's analytical region (except per the Cleaning Procedure above); otherwise, the infrared beam can be partially blocked, causing the sensor to generate false readings. All objects must be removed from the sensor's analytical region for it to function properly.
Failure to follow this warning can result in serious personal injury or death.