Calibration
The device must be calibrated if it does not pass a bump test.
Perform a bump test (see Function Checks Before Use) before each day's use to verify proper device operation. The device must pass the bump test. If it fails the test, perform a calibration before using the device.
A calibration consists of the adjustment of the sensor output to match the precise concentration value of a known, traceable, calibration gas cylinder. A calibration can be performed at any time to ensure maximum accuracy. Calibration frequency is often stipulated by national or corporate regulations; however, a calibration should be performed periodically at regular intervals or if the unit fails a bump test. MSA recommends a calibration interval of 2 months for devices with XCell Pulse technology and a maximum 6 months for devices with standard XCell sensors.
Make sure that the calibration is carried out in clean, non-contaminated ambient air.
WARNING!
Regulators and tubing used for bump testing and calibrating Cl2 or NH3 must be labelled by the user for that specific gas and must only be used for that gas exclusively in the future.
Failure to follow this warning can result in serious personal injury or death.
|
Due to high reactivity of Cl2 and NH3 gas, ambient humidity and calibration tubing material can react with the gas and cause the concentration reading to be lower than the actual concentration. When calibrating or bump checking with these gases, use dry tubing (for adequate material see Ordering Information). For best calibration, use the shortest possible tubing to connect to the calibration cylinder for this gas. |
Devices must be calibrated:
| • | after subjected to physical shock, |
| • | after any extreme changes in the atmospheric temperature, |
| • | after use under high gas concentrations, |
| • | if the bump test/FAS failed, |
| • | at certain intervals by local procedures. |
Calibration mode can be entered after the info screens have been displayed (see Figure 10 ).
| 1. | Press button for one second to access the information page. |
| 2. | When ZERO? is displayed, press the button for a zero calibration. |
|
If no zero calibration is carried out, the device returns to normal operating mode. |
| • | During the setup, the hour glass, the no calibration gas icon and the measured gas concentration are displayed. |
| • | If the zero cal operation fails, ERR is displayed. The device returns to normal operation after a button press. |
| • | If the zero calibration is successful, PASS is displayed followed by SPAN?. |
| 3. | During the SPAN? display, press the button to start the calibration mode. |
| 4. | Feed test gas into the device: |
Connect the regulator (screwed on the calibration gas cylinder) and the sensor opening with a tube and open the regulator.
Possible test gases (see Ordering Information).
WARNING!
| • | The concentration of the test gas used must match the stipulated in Sensor Data to calibrate the sensor correctly. |
| • | For two gas detectors, only calibration gas mixes can be used to calibrate the sensor correctly. |
| • | An incorrect calibration can lead to serious personal injury or death. |
Failure to follow this warning can result in serious personal injury or death.
| • | The current gas reading, hour glass and calibration gas cylinder icon are displayed. |
| • | If calibration is successful PASS is displayed and the device returns to normal operating mode. |
| 5. | Close the regulator. |
| • | For devices with XCell Pulse technology, WAIT is displayed together with the “no gas cylinder” icon. This shows that the regulator must be closed and the calibration gas must be removed from the device. Once gas is removed, the device will perform a secondary calibration operation (pulse check) on the sensor. During the pulse check, a countdown is displayed. The device will then return to normal operating mode. |
| • | If the span calibration fails, ERR is displayed. The device returns to normal operation after a button press. |
| 6. | If calibration fails, check: |
whether the sensor inlet or sensor surface is dirty,
whether the correct test gas was used,
whether the test gas cylinder is empty or the date has expired,
whether the test gas hose was connected to the sensor,
whether the flow regulator is set to 0.25 l/min.
| 7. | If necessary, repeat steps (1) to (6). |
PASS is displayed. Otherwise (ERR), the device must be taken out of use.
If the calibration is successful, a Ö is displayed for 24 hours. If the safe LED (green) option is enabled, the green LEDs will flash periodically.
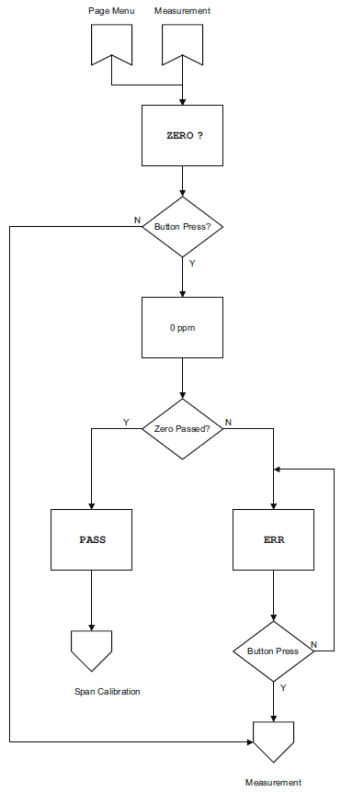
Figure 11 Zero calibration
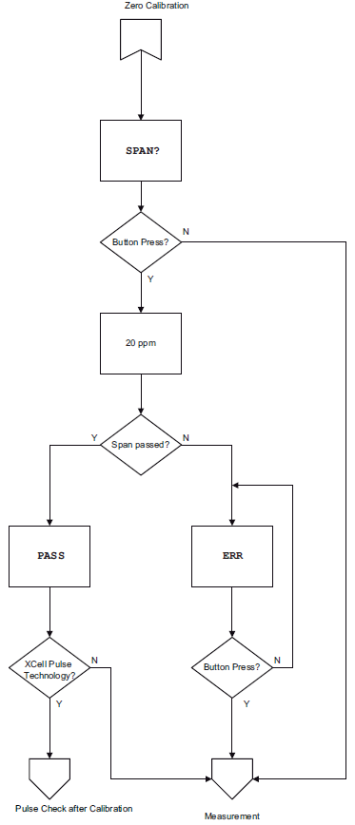
Figure 12 Span calibration
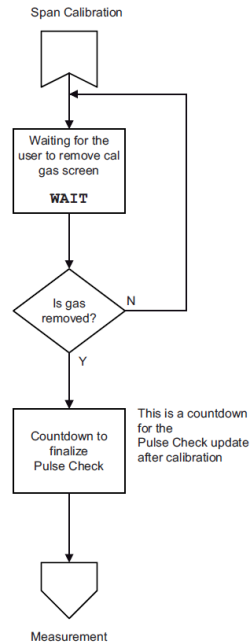
Figure 13 Pulse check after calibration for devices with XCell Pulse technology