Replacing the Battery
WARNING!
Risk of explosion: Do not change batteries in hazardous areas.
Failure to follow this warning can result in serious personal injury or death.
Only replace with battery as listed in Replacement Parts and Accessories.
|
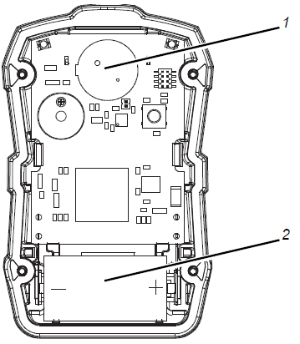
1 |
Sensor |
|
2 |
Battery |
| 1. | Remove the four screws securing the case halves together. |
| 2. | Carefully remove the front case to expose the battery. |
The circuit board will remain with the back half of the case.
Do not touch the display connections (two blue connectors).
| 3. | Remove the depleted battery and replace only with one specified in Ordering Information. |
Be sure to observe proper polarity on the battery, as shown on the battery holder.
| 4. | Ensure the interface and connectors for the display are clean and free of dirt for proper operation. |
If necessary, the display connectors can be cleaned with a soft, lint free cloth.
| 5. | Reinstall the front case, making sure the sensor, horn gasket and sensor gasket are properly seated. |
CAUTION!
Do not over-tighten the screws; otherwise, the case may be damaged.
Failure to follow this caution can result in minor or moderate injury.
| 6. | Replace the four screws, tighten with a torque value of 2.5 in-lbs (0.28 Nm). |
CAUTION!
After replacing the battery or if the device was without power for some time, it is necessary to set time and date again using the MSA Link software.
Failure to follow this caution can result in minor or moderate injury.
When switching ON the device for the first time and after a battery replacement the device will initialize the battery. During a battery initialization, BATT TEST is shown on the display followed by a sequence of LED illuminations and activation of the vibration motor. The device then continues the start-up as described in Turning ON the Device.
NOTE: It may take 24 hours for the battery condition icon to indicate the full battery charge level after the battery initialisation.