Turning ON the Device
|
•
|
All display segments are activated |
|
•
|
Vibrating alarm is activated. |
The device displays the following for a few seconds each:
|
•
|
WAIT (Displayed for up to 20 seconds during sensor discovery) |
|
•
|
If enabled: individual alarm indication settings |
|
•
|
Low alarm icon with low alarm setpoint |
|
•
|
High alarm icon with high alarm setpoint |
|
•
|
STEL alarm icon with STEL alarm setpoint |
|
•
|
TWA alarm icon with TWA alarm setpoint |
|
•
|
Calibration gas settings |
|
2.
|
If the LastCalDate page is enabled, the display will show the last cal date of the installed sensor (DD-MMM-YY). |
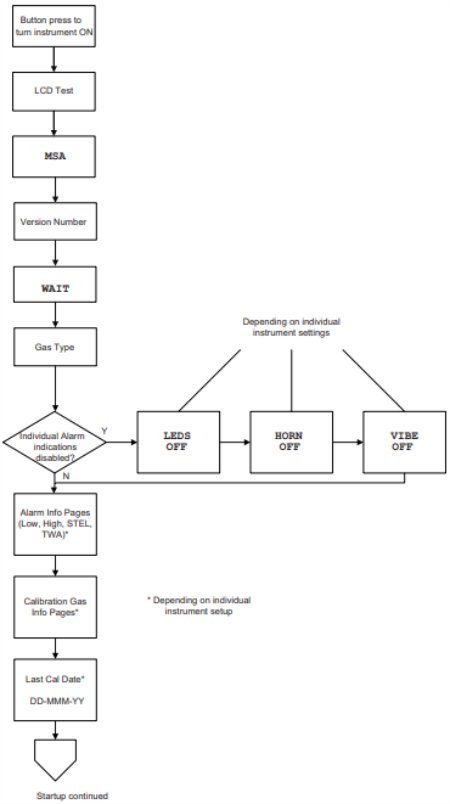
Figure 3 Startup
|
3.
|
Fresh Air Setup prompt (FAS?)/Pulse Check start screen (PULSE) is displayed, depending on the sensor installed. |
WARNING!
Only carry out the Fresh Air Setup/bump test in fresh, uncontaminated air; otherwise, inaccurate readings can falsely indicate a hazardous atmosphere as safe. If the quality of the surrounding air is uncertain, do not carry out a Fresh Air Setup/bump test. Do not use the Fresh Air Setup/bump test as a substitute for daily calibration checks. The calibration check is required to verify span accuracy.
Failure to follow this warning can result in serious personal injury or death.
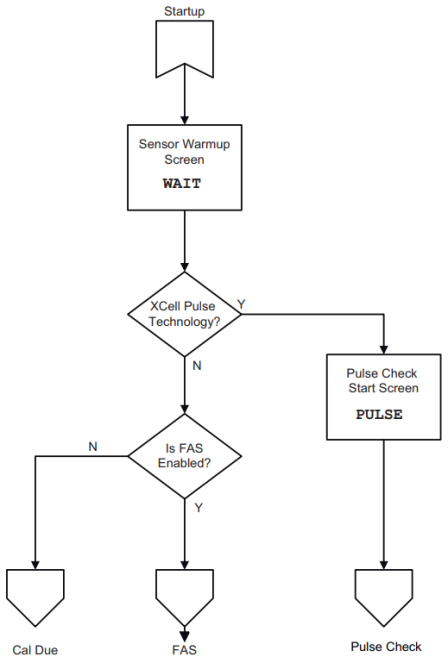
Figure 4 Startup, continued
FAS
FAS? is displayed.
|
1.
|
To start the FAS press the button while FAS? is displayed. |
The display will show the results of the setup, PASS or ERR.
| |
The fresh air setup has limits.
If a hazardous level of gas is present, the device displays ERR.
Press the button to acknowledge the error and perform a calibration.
|
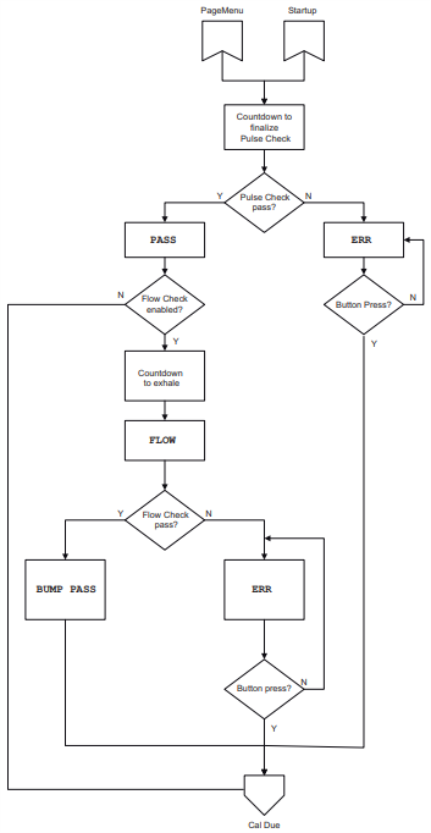
Bump Test for Devices with XCell Pulse Technology
This test will start automatically.
|
•
|
PULSE is displayed shortly. |
|
•
|
The electronic pulse check icon and a countdown are displayed. |
|
•
|
At the end of the countdown, the results of the electronic pulse check are displayed (PASS or ERR). |
If ERR:
|
1.
|
Press the button to return to normal operating mode and perform a calibration. |
If PASS:
|
•
|
The display shows the Flow check icon and WAIT for followed by a countdown. |
At the end of the countdown, the display will show FLOW and the green LEDs near the sensor will flash.
|
1.
|
Exhale into the device. |
Hold device close to mouth (5 cm/2 inches distance) and blow forcefully onto the sensor opening for 2 seconds.
The results of the test are then displayed (PASS or ERR).
If ERR:
|
1.
|
Press the button to return to normal operating mode and perform inspection of sensor. |
|
2.
|
Repeat the bump test if necessary. |
|
3.
|
If the bump test fails, calibrate the device (see Calibration). |
If PASS:
|
•
|
The device returns to normal operating mode. |
|
•
|
A Ö is displayed for 24 hours to indicate that the self-test was successful. |
|
•
|
If the safe LED (green) option is enabled, the green LEDs will flash periodically. |
To clean the sensor inlet before or after a flow test, only use approved cleaner described in Ordering Information.
|
4.
|
To bypass FAS, do not press the button. |
The device continues the ON sequence.
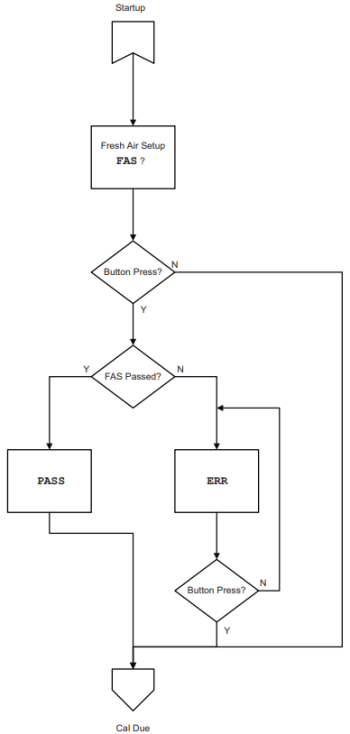
Figure 5 FAS (Devices without XCell Pulse technology)
Figure 6 Bump test for devices with XCell Pulse technology
|
5.
|
If Calibration Due (CAL DUE) is enabled via MSA Link software (default is OFF): |
|
•
|
If calibration is due, CAL DUE will scroll across the display continuously. Press the button to proceed. A calibration is now necessary. |
|
•
|
If calibration is not due, CAL, the number of days, and DAYS will scroll across the display once before proceeding. |
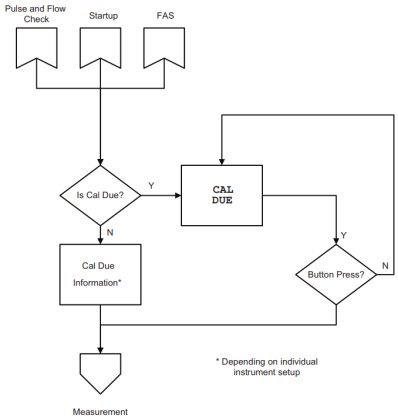
Figure 7 Calibration due
The device displays the gas reading in ppm or mg/m³ and the battery condition.
Figure 8 Measurement