Device Setup
This section describes the configuration options that are available through the Options Setup menus.The setup menus can be accessed only when the device is turned ON while pressing and holding the p button (see Fresh Air Setup (FAS) and Reset Screen Controls).
This mode can only be activated at device turn-ON.
The operation is as follows:
|
1.
|
Press and hold the p button while turning the device ON. |
|
a.
|
Use the p and q-- buttons to enter the setup password. The default password is "672". |
|
2.
|
Press  button to enter the setup menus. button to enter the setup menus. |
|
a.
|
Incorrect password: device enters the Measure mode. |
|
b.
|
Correct password: device continues/beeps three times. |
NOTE: The password can be changed through the MSA Link software.
In the Setup mode:
|
•
|
Press the button to store chosen value or go to the next page. |
|
•
|
Press p button to increase values by one or toggle a selection ON or OFF. |
|
•
|
Press and hold p button to increase values by 10. |
|
•
|
Press q-- button to decrease values by one or toggle a selection ON or OFF. |
|
•
|
Press and hold q-- button to decrease values by 10. |
The following options are available by pressing the q-- and p buttons:
|
•
|
Sensor Setup (SENSOR SETUP) 1 |
|
•
|
Calibration Setup (CAL SETUP) 1 |
|
•
|
Alarm Setup (ALARM SETUP) 1 |
|
•
|
Setup Time and Date (TIME SET) 1 |
Sensor Setup
Each sensor can be turned ON or OFF.
For more information, see the flow charts in Sensor Setup.
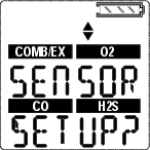
Figure 4 Sensor Setup
|
1.
|
To bypass this setup, press the q-- or p button; otherwise, continue as follows. |
|
2.
|
Press the button to enter the submenu. |
|
3.
|
Use the q-- or p button to change the option and confirm with the button. |
|
4.
|
Repeat this procedure for all other sensors. |
|
5.
|
After setting the last sensor, continue to Calibration Setup. |
Calibration Setup
The user can change and set the calibration values for each sensor.
It is also possible to select whether the Cal Due screen is displayed and set the number of days until the next calibration is due.
For more information, see the flow charts in Calibrations .
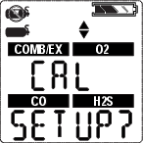
Figure 5 Calibration Setup
|
1.
|
To bypass this setup, press the q-- or p button; otherwise, continue as follows. |
|
2.
|
Press the button to enter the submenu. |
The calibration gas concentration of the first sensor is shown.
|
3.
|
Press the q-- or p button to change the value. |
|
4.
|
Press the button to store the value. |
Setup screen for the next sensor is displayed.
|
5.
|
Repeat the procedure for all other sensors. |
After setting the last sensor, the user is prompted to set CALDUE.
|
6.
|
Press the q-- or p button to enable or disable CALDUE. |
|
7.
|
Confirm with the button. |
|
8.
|
If CALDUE is set ON, press the q-- or p button to select the number of days |
|
9.
|
Confirm with the button. |
|
10.
|
After confirmation, continue to Alarm setup. |
Alarm Setup
The user can switch all alarms ON or OFF and change the alarm set points for each sensor. For more information, see the flow charts in Alarm Setup .
See Factory-set Alarm Thresholds and Setpoints for alarm adjustment limits. The value of the High Alarm can only be set to a value that is higher than the Low Alarm set point.
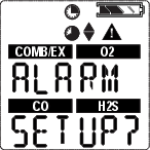
Figure 6 Alarm Setup
|
1.
|
To bypass this setup, press the q or p button; otherwise, continue as follows. |
|
2.
|
Press the button to enter the submenu. |
|
3.
|
Set alarms on or off by pressing the q or p button. |
|
4.
|
Press the button to confirm the selection. |
LOW ALARM settings for the first sensor display.
|
5.
|
Press the q or p button to change the value. |
|
6.
|
Press the button to store the value. |
HIGH ALARM settings for the first sensor display.
|
7.
|
Press the q or p button to change the value. |
|
8.
|
Press the button to store the value. |
STEL ALARM settings (for toxic sensors only) display.
|
9.
|
Press the q or p button to change the value. |
|
10.
|
Press the button to store the value. |
TWA ALARM settings (for toxic sensor only) for display.
|
11.
|
Press the q or p button to change the value. |
|
12.
|
Press the button to store the value. |
|
13.
|
Repeat the procedure for all other sensors. |
|
14.
|
After setting the last sensor, continue to Time and Date setup. |
60% L.E.L. or 3.0% volume of methane is the maximum High Alarm set point that can be programmed by the user.
The alarms can be silenced momentarily by pressing the p button. However, if the gas concentration causing the alarm is still present, the device will go back into alarm.
Setup Time and Date
This submenu is for setting date and time.
For more information, see the flow charts in Start Up Sequence (Power on) .

Figure 7 Date and Time Setup
|
1.
|
To bypass this setup, press the q-- or p button; otherwise, continue as follows. |
|
2.
|
Press the q button to enter the submenu. |
|
3.
|
Set month by pressing the q-- or p button. |
|
4.
|
Press the q button to confirm month. |
|
5.
|
Repeat this procedure for day, year, hours and minutes. |
By default, time displays in a12 hour format.
The EXIT screen displays next.
|
6.
|
Confirming this screen with the q button exits the device setup. |
If the sensors have not warmed up yet, the countdown displays.
The device then goes to Measuring mode.