Instrument Options
|
SETTINGS |
|
|

The Instrument Options menu allows modification of different device options:
| • | Sensor Setup (enable/disable the channel) |
| • | Language Setup |
| • | Time Date Setup |
| • | Datalog Intervals |
| • | Stealth Mode |
| • | Operating Beep |
| • | Backlight Options |
| • | VOC Gas Setup |
| • | Bluetooth |
Press
| • | the q button go to next page |
the p button to go previous page
the  button to enter setup.
Setting Sensor Options
| 1. | Press the button to enter setup. |
Following screen displays:
|
|
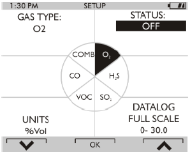
Figure 15 Sensor Options Setup
| 2. | Press the q button to select sensor, press the button to make changes. |
The sensor information is displayed and the sensor can be enabled or disabled.
|
Other operations such as changing the combustible gas type (Methane, Butane, Propane etc.) and units (ppm to mg/m3) are only possible using the MSA Link software. |
| 3. | Change status by pressing the q or p button. |
| 4. | Press the button to confirm and advance to next screen (next sensor). |
| 5. | Perform the sequence for all other sensors. |
After setting up the last sensor the device goes to the next Setup Page.
Language Setup
This option is for setting the language of the device.
| 1. | Press the button to enter setup. |
| 2. | Change language by pressing the q or p button. |
| 3. | Confirm with the button. |
The device goes to the next Setup Page.
Time and Date Setup
This option is for setting the device time and date. The device first prompts to set the time and then it prompts for the date.
|
The time can be set up for either regular AM/PM or military time (through MSA Link software). AM/PM time is the default setting. |
| 1. | Press the button to enter setup. |
| 2. | Change hours by pressing the q or p button. |
| 3. | Confirm with the button. |
| 4. | Change minutes by pressing the q or p button. |
| 5. | Confirm with the button. |
The device goes to the Set Date Page.
| 6. | Change month, date and year by pressing the q or p button and confirming with the button. |
The device goes to the next Setup Page.
| 7. | Confirm with the button. |
The device goes to the next Setup Page.
Setting Stealth Mode
Stealth mode disables the visual, audible and vibrating alarms.
| 1. | Press the button to change mode (ON/OFF). |
| 2. | Press the q button to go to the next page or the p button to return to previous page. |
Setting Datalog Intervals
This option is for setting the intervals at which all the readings will be logged.
| 1. | Press the button to enter setup. |
| 2. | Change interval by pressing the q or p button. |
| 3. | Confirm with the button. |
The device goes to the next Setup Page.
Setting Operating Beep
| 1. | Press the button to change mode (ON/OFF). |
| 2. | Press the q button to go to the next page or the p button to return to previous page. |
Setting Backlight
| 1. | Press the button to enter setup. |
Change option by pressing the q or p button.
| 2. | Press the button to enter. |
| 3. | Change timeout by pressing the q or p button. |
| 4. | Press button to confirm timeout. |
PID Setup
WARNING!
It is very important to have an understanding of PID basics when changing PID settings. Failure to properly identify the VOC gas being measured and/or failures to select the correct Response Factor alarm values (exposure, STEL, TWA) that match the desired Response Factor and/or the correct lamp will result in erroneous readings or erroneous alarm limits that could cause death or serious personal injury.
The PID sensor should be configured prior to initial operation.
| 1. | Enter the correct password enter the 'Instrument Setup' menu and press the q button until VOC Gas Setup is highlighted, then select OK. |
There are five configuration pages available:
|
Configuration page |
|
||||||||||||||||||
|
Menu Enable |
Menu Enable On allows the VOC gas to be changed without entering the password. When Menu Enable On is active, the "Change VOC Gas?" option is available from the Main Measuring Page as described in On-Screen Indicators. The default setting is ON. |
||||||||||||||||||
|
Maintain VOC Gas |
Maintain VOC Gas ON retains the currently selected VOC gas when the device is powered down and restarted. If this option is set to OFF the device will always power up with isobutylene selected as the VOC gas type. This option should be set to ON if the same VOC gas is to be monitored on every use. The default setting is ON. |
||||||||||||||||||
|
Favorites Setup |
This set of pages allows the default Favorites list to be changed with VOC gases suitable for the user's particular environment. The ten default Favorites will be displayed on initial use. The first screen in the Favorites Setup page will ask which Favorite is to be replaced.
The next screen will display the current 10 Favorites, and options for Custom Gas and All Gases.
A Confirmation Screen will be displayed showing the gas to be replaced and the gas to be added to Favorites. Selecting YES will return to the Favorites list showing the new gas, selecting NO will return to the Favorites list showing the previous Favorites and selecting ABORT will return to the menu page. |
||||||||||||||||||
|
VOC Gas Selection |
This menu displays all of the gases available for detection by this PID sensor type. The gases are listed by an 8 character abbreviation. The full gas names are listed in PID Response Factor Table of this manual. The first 10 gases listed are the Favorites gases followed by options for the All Gas List and the Custom List. Gas names starting with the letters A-Z are listed alphabetically. Each page contains 14 gas names.
Holding down the q or p button for more than 2 seconds will scroll a full page at a time. Selecting OK will display a confirmation page that contains the following information:
|
||||||||||||||||||
|
Custom Gas Setup |
The Custom Gas Setup allows a unique 8 character gas name and associated Response Factor to be entered for up to 10 Custom gases.
Once the RF is complete, a final confirmation page will display.
|
WARNING!
Failure to properly identify the VOC gas being measured and/or failures to select the correct alarm values (exposure, STEL, TWA) that match the desired Response Factor and/or the correct lamp will result in erroneous readings that could cause death or serious personal injury.
Enabling Bluetooth
The device is configured with a Bluetooth capable communications feature.
| 1. | Press the button to enable or disable the Bluetooth communications device (ON/OFF). |
| 2. | Press the q button to to return to the Main Menu or the p button to return to previous page. |
Back To Main Menu
There are three options at this point:
|
the q button |
Sensor Options menu |
|
the p button |
Previous Setup page in the Instrument Options menu |
|
the |
Instrument Options menu |