Bump Test
A bump test quickly confirms that the gas sensors are functioning. Perform a full calibration to ensure accuracy.
There are two methods to perform a bump test on the ALTAIR io 4:
|
•
|
Automatically through the ALTAIR io DOCK |
|
•
|
Manually using proper calibration gas, regulator, tubing, and a calibration cap. |
Bump test frequency is often stipulated by national or corporate regulations; however, bump testing before each day's use is generally the accepted best safety practice. Perform a bump test more frequently if the device is subjected to physical shock or high levels of contaminants.
WARNING!
|
•
|
Perform the bump test per the instructions in this user guide. Do not continue operation of a detector that is not able to pass a bump test. |
|
•
|
Perform a bump test more frequently if the tested atmosphere contains the following materials, which may desensitize the combustible gas sensor and cause erroneous readings: |
|
○
|
Lead-containing compounds |
|
○
|
Hydrogen sulphide exposures over 200 ppm or exposures over 50 ppm for one minute. |
Failure to follow these warnings can result in serious personal injury or death.
If the device fails the bump test, perform a calibration to check sensor accuracy per the Calibration section before using the device.
ALTAIR io DOCK Bump Test
To perform the automatic bump test:
|
1.
|
Insert the device with the display facing the ALTAIR io DOCK Test Stand until it clicks. |
|
2.
|
The appropriate test runs automatically based on the Grid-configured settings and indicates bump test results upon completion. |
|
3.
|
Remove the ALTAIR io 4 by pressing the gray release button. |
Manual Bump Test
The manual bump test requires the following equipment:
|
•
|
Proper, Unexpired Calibration Gas Cylinder |
|
•
|
0.25 liters/min. Flow Regulator |
|
•
|
1/8” ID Superthane Ester Tubing |
To perform the manual bump test:
|
1.
|
Verify the gas concentrations displayed match calibration gas cylinder. |
|
2.
|
Navigate to the bump test menu option. |
|
|
3.
|
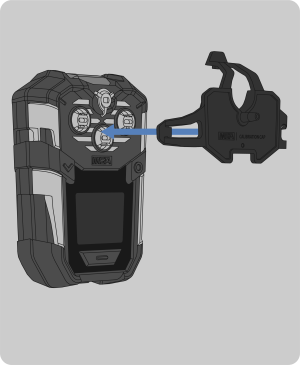
Install the calibration cap. |
|
a.
|
Insert the tab on the calibration cap into the left slot on the device. |
|
b.
|
Press the calibration cap until it seats onto the device. |
|
c.
|
Press both the top and right tab down onto the device until they snap into place. |
|
d.
|
Ensure the calibration cap is properly seated. |
|

|
|
e.
|
Connect one end of the tubing to the calibration cap. |
|
f.
|
Connect the other end of the tubing to the gas regulator. |
|
|
4.
|
Select Start to begin the bump test. |
|
5.
|
Open the pressure reducer valve on the calibration gas cylinder. |
|
6.
|
The device will display the bump test results. |
|
7.
|
Close the valve after bump testing. |
|
8.
|
Remove the calibration cap. |