Switch Selectable Options
All settings on the FL5000 are selected via a dipswitch on the Power/Relay board or via Modbus (overrides switch settings).
To set these options:
| 1. | Remove the detector head from the Base Assembly and locate the dipswitch per the Dipswitch Location figure in Time Delay Settings |
| 2. | On the dipswitch, ON/CLOSED means the switch is pushed in on the side labeled ON or CLOSED (opposite the OPEN side). |
| 3. | OFF/OPEN means the switch is pushed in on the side with the number corresponding to the switch position or the side labeled OPEN – refer to Time Delay Settings for dipswitch assignments. |
The settings for the INSTANT ALARM and SUSTAINED ALARM outputs are covered in Terminal Connections.
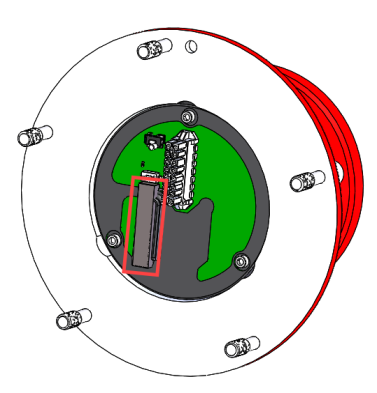
Figure 19 Dipswitch Location
|
Position |
||||||||||||
| 1 | 2 | 3 | 4 | 5 | 6 | 7 | 8 | 9 | 10 | 11 | 12 | |
| High Sensitivity | OFF | OFF | - | - | - | - | - | - | - | - | - | - |
| Medium Sensitivity | ON | OFF | - | - | - | - | - | - | - | - | - | - |
| Low Sensitivity | OFF | ON | - | - | - | - | - | - | - | - | - | - |
| 0 Sec Alarm Time Delay | - | - | ON | ON | - | - | - | - | - | - | - | - |
| 8 Sec Alarm Time Delay | - | - | OFF | ON | - | - | - | - | - | - | - | - |
| 10 Sec Alarm Time Delay | - | - | OFF | OFF | - | - | - | - | - | - | - | - |
| 14 Sec Alarm Time Delay | - | - | ON | OFF | - | - | - | - | - | - | - | - |
| Sustained Alarm Non-Latching | - | - | - | - | OFF | - | - | - | - | - | - | - |
| Sustained Alarm Latching | - | - | - | - | ON | - | - | - | - | - | - | - |
| Instant Alarm Non-Latching | - | - | - | - | - | OFF | - | - | - | - | - | - |
| Instant Alarm Latching | - | - | - | - | - | ON | - | - | - | - | - | - |
| Sustained Alarm Normal De-Energized | - | - | - | - | - | - | OFF | - | - | - | - | - |
| Sustained Alarm Normal Energized | - | - | - | - | - | - | ON | - | - | - | - | - |
| Instant Alarm Normal De-Energized | - | - | - | - | - | - | - | OFF | - | - | - | - |
| Instant Alarm Normal Energized | - | - | - | - | - | - | - | ON | - | - | - | - |
| LEDs - Standard Mode | - | - | - | - | - | - | - | - | OFF | - | - | - |
| LEDs - Alternate PEMEX Mode | - | - | - | - | - | - | - | - | ON | - | - | - |
| HART Enabled | - | - | - | - | - | - | - | - | - | OFF | - | - |
| HART Disabled | - | - | - | - | - | - | - | - | - | ON | - | - |
| Window Heater Disabled | - | - | - | - | - | - | - | - | - | - | OFF | - |
| Window Heater Enabled | - | - | - | - | - | - | - | - | - | - | ON | - |
| Test Lamp AO Mode Disabled | - | - | - | - | - | - | - | - | - | - | - | OFF |
| Test Lamp AO Mode Enabled | - | - | - | - | - | - | - | - | - | - | - | ON |
| BLE Enabled | ON |
| BLE Disabled | OFF |
| AO Sink | Sink |
| AO Source | Source |